Saturday, July 5, 2014

the bestest, easiest, fastest kimchi yet! (UPDATED)

Tewshooz and Dani - this one's for the both of you!

this kimchi is awesome! i love it! it's super-quick and can be eaten immediately and it will still taste like kimchi. but because it's made with regular cabbage and not nappa cabbage, it is far crunchier. i don't know about you - but i love my kimchi to be crunchy!


Ingredients:

1 head of cabbage, cored
1 cup of cold water
1/4 cup of kosher salt
1/3 cup of red pepper flakes (the korean kind, not chili flakes)
1/4 cup of fish sauce
1/4 cup of crushed garlic
as much chopped green onion (or chives) as you like (i like about 1/4 cup cut into one inch pieces)
1/2 cup of carrot, julienned
1/2 cup of daikon radish, julienned (i left this out this time as i didn't have any)
1 tbspoon of sugar
rubber or surgical gloves - A MUST!
a clean, sterilized glass jar with lid

Instructions:
(i am so sorry that i didn't get pictures of the steps of the process. if anyone wants to see the actual steps, let me know and the next time i make a batch - which will be soon! i will have my husband take pics!)

1. chop the cabbage as coursely, or as finely as you wish. some people like uniformed, julienned strips whereas i prefer a much courser chop. i just cut mine into big chunks.

2. in a large non-reactive bowl (glass or ceramic), put in your cabbage, followed by the water. using your hands, rub the cabbage all through the water so that it all gets wet.

3. now add your kosher salt to the bowl and really get in there with your hands and rub the salt all through the cabbage and the water. you will feel the cabbage start to wilt almost right away.

4. now set aside your cabbage and crush enough garlic to make 1/4 of a cup. depending on the size of your clove you might use the whole clove or 2/3 of it. no matter. add the crushed garlic to another bowl in which you will make the kimchi paste. go and massage your cabbage for a bit moving all of the leaves through the water and rubbing the kosher salt on all of the leaves.

5. now add the red pepper flakes to your kimchi paste. add the fish sauce to the kimchi past. go back and massage your cabbage again.

6. add the green onion, carrot, daikon and sugar. go back and massage your cabbage again.

7. now stir your kimchi paste with a wooden spoon - it won't properly come together until you mash it up with your glove-wearing hands.

8. now massage your cabbage one last time before dumping it into a colander and rinsing, rinsing, rinsing. make sure to rinse several times and be sure to rinse every piece. put the cabbage into a non-reactive bowl big enough to mix in.

9. dry your hands really good and put your gloves on. mash the kimchi paste with your hands and really mix it up together.

10. grab a nice handful of kimchi paste and start rubbing it through your cabbage leaves. repeat this until you are out of kimchi paste and all of the cabbage has been rubbed with the paste. just smash your hands in there like you were mixing a salad or kneading bread.

11. now take small handfuls of your cabbage and drop them in the jar. with every handful, push down with your hand, or if your hand is too big to fit in the jar use a large wooden spoon. press down as hard as you can. you will notice that the cabbage is now releasing juice and that's a good thing!

12. keep adding handfuls to the jar, pressing as hard as you can to release the juice and get rid of air bubbles.

13. fill the jar to one inch head space, wipe the outside and inside rim with a damp cloth and put the lid on.

you can eat this kimchi right away and it is delicious! or you can let it sit at room temperature for 3 days in order to ferment a little more. we always eat a big forkful right before we put the lid on and then let it sit for 1 day.

i swear this is the best-tasting kimchi out there. and i do know my kimchi. i love it with the cabbage and it keeps so crisp and fresh - yummeh! the other great thing is that cabbage is cheap whereas nappa is expensive. cabbage keeps much longer than nappa as well.

anyway,  i hope that you enjoy!
--------------
UPDATE:

here is a pic of the korean red pepper powder that is traditionally used in making kimchi:


this is the front of the bag. the korean reads:  HAE CHAN DEUL, KO CHA(S) KA RU, which basically translated is, the name of the company is HAE CHAN DEUL, and KO CHA(S) KA RU, is exactly translated as red pepper powder.

here is the back of the bag:


as you can see, from the pictures on the bag, the powder is made from a cross between a jalapeno and cayenne pepper. apparently you can not order the seeds for these peppers from Korea due to some strange embargo or something. but you can order red pepper powder over the internet from a variety of places. just look up korean red pepper powder on the net.

Monday, June 16, 2014

homemade hot sauce!

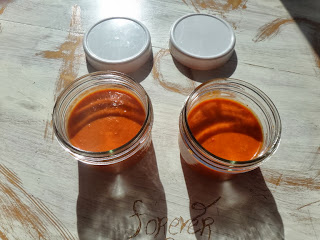
 here is my version of homemade hot sauce:


Ingredients:
(depending on how hot or sweet you want your sauce, you can use a variety of peppers - these ones were freshly-picked off the vine)

3 big bomb peppers, sliced (you can keep the seeds in or remove them, we keep them in for added taste)
2 sweet italian peppers, sliced
5 cayenne peppers, sliced
1/2 a medium white, sweet onion thinly sliced
4-5 garlic cloves (we probably used 10 but we love garlic!)
2 cups of water
1 cup of white vinegar
1 teaspoon of olive oil
sea salt and fresh-cracked pepper to taste

Steps:

1. sautee the peppers in the olive oil with onion and garlic for about 4-5 minutes. 

2. add the water.


3. keep cooking on medium-high heat until you have cooked off the majority of the water.

4. cool the peppers to room temperature, and once cooled, puree them in the blender.

5. add the vinegar as you are pureeing.


6. puree until smooth if you like a smooth, liquidy sauce, or just chop if you like a chunky sauce.

Notes - you can add/substitute tabasco and/or serrano chilies to make the sauce hotter, or jalapeno peppers.
To make the sauce sweeter, add more italian peppers and less hot peppers. To make the sauce more vinegary, add a little more vinegar.

This recipe is a base recipe - once you make it, you can figure out your own way to tweak it to your liking!

Mike - i am sure that you can make this sauce with either dried or freeze-dried peppers. You'll have to give it a test try and let us know what you used and how it turns out!

Saturday, June 7, 2014

i looove gwak-a-mole!

(h/t to poor Joan Jett for what i have done to her song. Ms. Jett - i apologize...but just can't help myself!)

(sung to the tune of "i love rock 'n roll" - by the great Joan Jett)

"i love gwak-a-mole
so put another dime in the jukebox baby
i love gwak-a-mole
so come and take your time and dance with me - YA!"

i love pronouncing words in english phonetically! i know that "guacamole" is properly pronounced "gwa-ka-mol-ee", but i just can't help myself...being a trained linguist and all.


you can serve guacamole on a fancy platter with salsa, toasted greek pita chips, some mango and additional lemon and limes for added punch....or you can drop dollops of the stuff on your loaded nachos!


with fresh-made guacamole you can dip chips in, crackers, all kinds of veg - the possibilities are endless. and if you aren't making your own guacamole...well, all i can say is shame on you. and i mean it. shame on you.

here's some awesome-kick-you-into-next-week guacamole. give it a try!

Ingredients:

2 nicely-ripened avocados (they should be firm, but a  little softish to the touch)
8 million garlic cloves (ok - maybe 4-6 for normal people, but we loooove garlic)
2 or 3 big, heaping spoons of greek yoghurt
the juice of half of a lime
a big dash of cumin
a big dash of cayenne (or lay off it you don't like it too spicy!)
a big dash of turmeric
sea salt and fresh-cracked black pepper

Directions:

1. Cut your avocados in half and scoop out the pits. BIG SECRET: suck the avocado off of the pits - it will be messy! then rinse them nice and clean! and set them aside!

2. Scoop the 2 sides of the avocados into a bowl. Mash the avocado with a fork - i like mine chunky so i don't mash it too much. if you like a smoother guacamole - mash it up quite a bit. you can use a potatoe masher if you like.

3. Crush the garlic cloves into the avocado mash.

4. Add the lime and all of the spices.

5. Splooch in how much greek yoghurt that you would like.

6. Stir and mash all of this together and now here's another BIG SECRET: once you are satisfied with the taste - drop the avocado pits into the centre of the bowl/container. having the pits in the bowl/container helps keep the guacamole from going brown too fast.

7. Refrigerate for at least one half hour before serving to let all of the flavours mingle.

Notes:

Yes, i know that some tried and true Mexican and/or other recipes call for adding tomatoes, onions, chives - you name it. But, i always serve guacamole WITH home-made salsa, so tomatoes, onions and chives are already covered by the salsa. It's up to you to add or subtract to this recipe. Like all recipes - it's all about tweaking until it's right for you.

i hope that you enjoy. but anyway...

"i love gwak-a-mole
so put another dime in the jukebox baby...."

(try getting that song out of your head for the next, say, day, day and a half - bahahahahah! your welcome!)

Thursday, June 5, 2014

Hollandaise sauce!

one of my favourite breakfast treats is hollandaise sauce on poached eggs on toast - yummeh!


here is my simple, yet delicious, tried and true hollandaise sauce recipe (and i have tried many over the years!!!!):

Ingredients:

1/2 cup of butter
3 large egg yolks, separated from the whites
1 Tablespoon plus one teaspoon of freshly-squeezed lemon juice
1/8 teaspoon of salt
a dash of cayenne pepper
a splooch of hot sauce (we use home-made but you can use Frank's or any other kind, and use as much as you want)
2 Tablespoons of hot water
freshly-cracked black pepper to taste

Garnish:
fresh-picked chives

Directions:

1. Heat the butter in a heavy saucepan, on low-medium heat, until hot and foamy - stay on it - don't let it brown at all.
2. In a bowl, whisk the egg yolks with lemon juice, salt, pepper, cayenne pepper and hot sauce.
3. Once the butter is frothy, gently whisk it into the egg yolk mixture - not all at once, just a steady, slow stream.
4. Add the water and continue whisking.
5. Return the mixture to the sauce pan and continue whisking over very low heat until slightly thickened.
6. Serve immediately or let stand over a bowl/pot of hot water for no longer than 30 minutes.

This hollandaise sauce is delicious! i love mine on poached eggs on toast...but as is pictured we also serve it over steamed broccoli and/or asparagus and/or any vegetable that you would like. Enjoy!

Thursday, May 22, 2014

beef liver pate

beef liver pate....on toasted onion bagels - yummeh!


i make my beef liver pate a little different than other recipes i have seen...but i created this recipe by tweaking my mother's recipe with a few other recipes. i hope that you will enjoy it!

Beef Liver Pate
(you can substitute lamb, pork or chicken in this recipe....or make a combination of one or several. it's all up to you!)

Ingredients:

2 large pieces of beef liver (or 4 small ones), already cooked and chopped into pieces
1 large onion, sliced into thin slices
1/2 cup of red wine
4 garlic cloves (i use about 6 because we really like garlic!)
1/3 cup of softened butter
2 tablespoons of butter
1 teaspoon of dijon mustard
several sprigs of fresh rosemary with the leaves pulled from the stem
several sprigs of fresh thyme
1 tablespoon of lemon juice
salt and pepper to taste.

Instructions:

1. In a saucepan, over low-medium heat, add 2 tablespoons of butter. Once the butter is melted, toss in your onion slices. Stir them around to get them coated with butter. Add salt and pepper.

2. Get all of your other ingredients prepared, while stirring the onions every few minutes. Let the onions cook for a good 15 mins, you want them browned and carmelized. If they are browning too fast, lower the heat. Do not worry about any brown bits on the bottom of the pan, they will be deglazed when the wine is added and add much flavour.

3. Remove 1/3 of the onions from the pan to a plate.

4. Next, pour in the wine, the crushed garlic, mustard, herbs, liver pieces and lemon juice. Turn the heat up a little and keep stirring to deglaze the pan. Let most of the wine evaporate. Set aside the pan to cool to room temperature.

5. Using another smaller pan, set the heat to low and return the 1/3 of onions that you set aside to this pan. Do not add any more butter as they will be butter-soaked. Cook them until crinkly brown and set them aside on a paper towel to dry off. You want them crinkly and crisp.

6. Once the pan of wine, liver, etc. is cooled, pour the mixture into your food processor and add the 1/3 cup of softened butter. Chop, blend and puree until you are happy with the consistency.

7. Spread on bagels, crackers, toast - whatever! Top with the crispy onions and Enjoy!

Thursday, April 17, 2014

nasturtium spice!

have you ever eaten a fresh nasturtium flower? they are so delicious! and spicey and peppery! they are excellent in salads or sandwiches.

here's a pretty little nasturtium:


they come in all different colours - red, orange, yellow and beige.


lots of people pick them fresh and add them to various food. but when you have a ton of them and you want that spicey, peppery taste to add to your food over the winter - you pick them and dry them! after you pick them, rinse them thoroughly. then give them a quick pat dry with a towel. then lay them on a screen, if you have one laying around (we have 20 million because jambaloney is a really good garbage picker!)


you could use a dehydrator or an oven...but heck, we have the good fortune to have a porch wrapped in plastic! it gets so hot out there on sunny days that it takes no time to dry the flowers!

make sure that the flowers are completely dry...and brittle....like this:


once you have gathered enough, stick them in a blender or anything that will chop them really fine to make a powder.


and there's your nasturtium spice!


you can add it to soups, stews, salads, dressings - whatever! it has a very delicious, lightly-spicey taste when it has been turned into powder. we love the stuff!!!

Saturday, March 29, 2014

a very basic, but nutritious and healthy, salad dressing - you can put it on anything!

it starts with about 20 swirls of olive oil.


next you dump in about a tablespoon of apple cider vinegar WITH the Mother in it.


next up is sea salt and freshly-cracked black pepper to taste.


a good pinch each of cayenne, turmeric and cumin.


3-4 cloves of garlic, a good-sized knob of ginger and a plop of unpasteurized honey.


a half of a lemon, or lime, squeezed in.


then you shake that baby up real good.


then you dump it on your salad.


the salad above is chiffonade romaine lettuce, tomatoe, cucumber, kiwi, orange, olives, feta and homegrown sprouts.

this salad below is iceburg lettuce, quinoa, 4 different-coloured peppers, broccoli, olives and feta.


and this is a bean salad with romaine lettuce, chickpeas, kidney beans, and 4 different-coloured peppers with cucumber.


this salad dressing can be put on anything - i even put it on fruit salad! it is not only delicious and healthy, the combination of garlic, vinegar with the mother, ginger and honey, all in conjunction, become a natural antibiotic. turmeric, cayenne and cumin are very good for your digestive system and for your overall health. if you eat this dressing every day, which we try to do, it will increase your overall health. you can also put this salad dressing on sardines - it tastes divine. and all of you better be eating a can of sardines at least once a week! i mean it! if not, i will have to come visit you and kick yer butt! and none of you want that! bahahahahhah!

please make this dressing, and make it to your taste. but don't leave any ingredient out. all of the ingredients are essential to maintaining good overall health!