one of my favourite breakfast treats is hollandaise sauce on poached eggs on toast - yummeh!
here is my simple, yet delicious, tried and true hollandaise sauce recipe (and i have tried many over the years!!!!):
Ingredients:
1/2 cup of butter
3 large egg yolks, separated from the whites
1 Tablespoon plus one teaspoon of freshly-squeezed lemon juice
1/8 teaspoon of salt
a dash of cayenne pepper
a splooch of hot sauce (we use home-made but you can use Frank's or any other kind, and use as much as you want)
2 Tablespoons of hot water
freshly-cracked black pepper to taste
Garnish:
fresh-picked chives
Directions:
1. Heat the butter in a heavy saucepan, on low-medium heat, until hot and foamy - stay on it - don't let it brown at all.
2. In a bowl, whisk the egg yolks with lemon juice, salt, pepper, cayenne pepper and hot sauce.
3. Once the butter is frothy, gently whisk it into the egg yolk mixture - not all at once, just a steady, slow stream.
4. Add the water and continue whisking.
5. Return the mixture to the sauce pan and continue whisking over very low heat until slightly thickened.
6. Serve immediately or let stand over a bowl/pot of hot water for no longer than 30 minutes.
This hollandaise sauce is delicious! i love mine on poached eggs on toast...but as is pictured we also serve it over steamed broccoli and/or asparagus and/or any vegetable that you would like. Enjoy!
- - - - - - - our recipeez, our outlook on food and some of our "good eats". welcome...and enjoy!
Thursday, June 5, 2014
Thursday, May 22, 2014
beef liver pate
beef liver pate....on toasted onion bagels - yummeh!
i make my beef liver pate a little different than other recipes i have seen...but i created this recipe by tweaking my mother's recipe with a few other recipes. i hope that you will enjoy it!
Beef Liver Pate
(you can substitute lamb, pork or chicken in this recipe....or make a combination of one or several. it's all up to you!)
Ingredients:
2 large pieces of beef liver (or 4 small ones), already cooked and chopped into pieces
1 large onion, sliced into thin slices
1/2 cup of red wine
4 garlic cloves (i use about 6 because we really like garlic!)
1/3 cup of softened butter
2 tablespoons of butter
1 teaspoon of dijon mustard
several sprigs of fresh rosemary with the leaves pulled from the stem
several sprigs of fresh thyme
1 tablespoon of lemon juice
salt and pepper to taste.
Instructions:
1. In a saucepan, over low-medium heat, add 2 tablespoons of butter. Once the butter is melted, toss in your onion slices. Stir them around to get them coated with butter. Add salt and pepper.
2. Get all of your other ingredients prepared, while stirring the onions every few minutes. Let the onions cook for a good 15 mins, you want them browned and carmelized. If they are browning too fast, lower the heat. Do not worry about any brown bits on the bottom of the pan, they will be deglazed when the wine is added and add much flavour.
3. Remove 1/3 of the onions from the pan to a plate.
4. Next, pour in the wine, the crushed garlic, mustard, herbs, liver pieces and lemon juice. Turn the heat up a little and keep stirring to deglaze the pan. Let most of the wine evaporate. Set aside the pan to cool to room temperature.
5. Using another smaller pan, set the heat to low and return the 1/3 of onions that you set aside to this pan. Do not add any more butter as they will be butter-soaked. Cook them until crinkly brown and set them aside on a paper towel to dry off. You want them crinkly and crisp.
6. Once the pan of wine, liver, etc. is cooled, pour the mixture into your food processor and add the 1/3 cup of softened butter. Chop, blend and puree until you are happy with the consistency.
7. Spread on bagels, crackers, toast - whatever! Top with the crispy onions and Enjoy!
i make my beef liver pate a little different than other recipes i have seen...but i created this recipe by tweaking my mother's recipe with a few other recipes. i hope that you will enjoy it!
Beef Liver Pate
(you can substitute lamb, pork or chicken in this recipe....or make a combination of one or several. it's all up to you!)
Ingredients:
2 large pieces of beef liver (or 4 small ones), already cooked and chopped into pieces
1 large onion, sliced into thin slices
1/2 cup of red wine
4 garlic cloves (i use about 6 because we really like garlic!)
1/3 cup of softened butter
2 tablespoons of butter
1 teaspoon of dijon mustard
several sprigs of fresh rosemary with the leaves pulled from the stem
several sprigs of fresh thyme
1 tablespoon of lemon juice
salt and pepper to taste.
Instructions:
1. In a saucepan, over low-medium heat, add 2 tablespoons of butter. Once the butter is melted, toss in your onion slices. Stir them around to get them coated with butter. Add salt and pepper.
2. Get all of your other ingredients prepared, while stirring the onions every few minutes. Let the onions cook for a good 15 mins, you want them browned and carmelized. If they are browning too fast, lower the heat. Do not worry about any brown bits on the bottom of the pan, they will be deglazed when the wine is added and add much flavour.
3. Remove 1/3 of the onions from the pan to a plate.
4. Next, pour in the wine, the crushed garlic, mustard, herbs, liver pieces and lemon juice. Turn the heat up a little and keep stirring to deglaze the pan. Let most of the wine evaporate. Set aside the pan to cool to room temperature.
5. Using another smaller pan, set the heat to low and return the 1/3 of onions that you set aside to this pan. Do not add any more butter as they will be butter-soaked. Cook them until crinkly brown and set them aside on a paper towel to dry off. You want them crinkly and crisp.
6. Once the pan of wine, liver, etc. is cooled, pour the mixture into your food processor and add the 1/3 cup of softened butter. Chop, blend and puree until you are happy with the consistency.
7. Spread on bagels, crackers, toast - whatever! Top with the crispy onions and Enjoy!
Thursday, April 17, 2014
nasturtium spice!
have you ever eaten a fresh nasturtium flower? they are so
delicious! and spicey and peppery! they are excellent in salads or
sandwiches.
here's a pretty little nasturtium:
they come in all different colours - red, orange, yellow and beige.
lots of people pick them fresh and add them to various food. but when you have a ton of them and you want that spicey, peppery taste to add to your food over the winter - you pick them and dry them! after you pick them, rinse them thoroughly. then give them a quick pat dry with a towel. then lay them on a screen, if you have one laying around (we have 20 million because jambaloney is a really good garbage picker!)
you could use a dehydrator or an oven...but heck, we have the good fortune to have a porch wrapped in plastic! it gets so hot out there on sunny days that it takes no time to dry the flowers!
make sure that the flowers are completely dry...and brittle....like this:
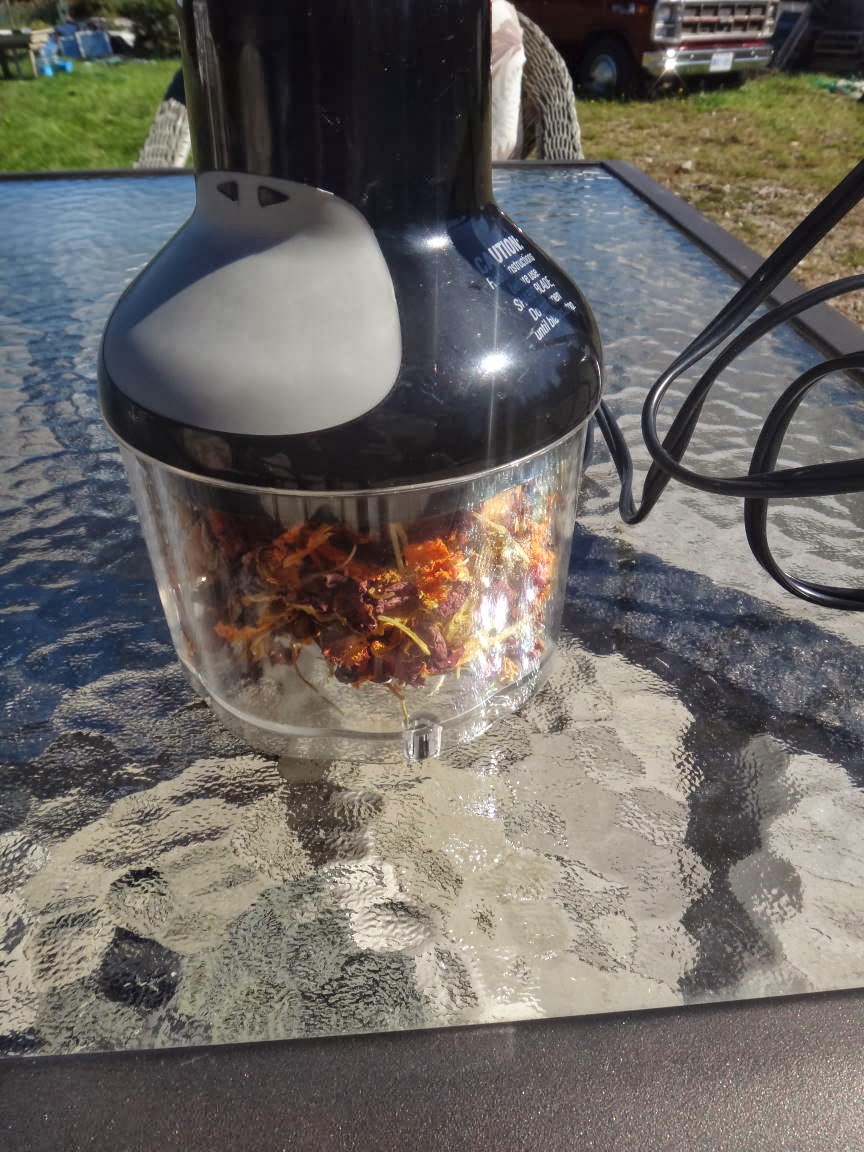
once you have gathered enough, stick them in a blender or anything that will chop them really fine to make a powder.
and there's your nasturtium spice!
you can add it to soups, stews, salads, dressings - whatever! it has a very delicious, lightly-spicey taste when it has been turned into powder. we love the stuff!!!
here's a pretty little nasturtium:
they come in all different colours - red, orange, yellow and beige.
lots of people pick them fresh and add them to various food. but when you have a ton of them and you want that spicey, peppery taste to add to your food over the winter - you pick them and dry them! after you pick them, rinse them thoroughly. then give them a quick pat dry with a towel. then lay them on a screen, if you have one laying around (we have 20 million because jambaloney is a really good garbage picker!)
you could use a dehydrator or an oven...but heck, we have the good fortune to have a porch wrapped in plastic! it gets so hot out there on sunny days that it takes no time to dry the flowers!
make sure that the flowers are completely dry...and brittle....like this:
once you have gathered enough, stick them in a blender or anything that will chop them really fine to make a powder.
and there's your nasturtium spice!
you can add it to soups, stews, salads, dressings - whatever! it has a very delicious, lightly-spicey taste when it has been turned into powder. we love the stuff!!!
Saturday, March 29, 2014
a very basic, but nutritious and healthy, salad dressing - you can put it on anything!
it starts with about 20 swirls of olive oil.
next you dump in about a tablespoon of apple cider vinegar WITH the Mother in it.
next up is sea salt and freshly-cracked black pepper to taste.
a good pinch each of cayenne, turmeric and cumin.
3-4 cloves of garlic, a good-sized knob of ginger and a plop of unpasteurized honey.
a half of a lemon, or lime, squeezed in.
then you shake that baby up real good.
then you dump it on your salad.
the salad above is chiffonade romaine lettuce, tomatoe, cucumber, kiwi, orange, olives, feta and homegrown sprouts.
this salad below is iceburg lettuce, quinoa, 4 different-coloured peppers, broccoli, olives and feta.
and this is a bean salad with romaine lettuce, chickpeas, kidney beans, and 4 different-coloured peppers with cucumber.
this salad dressing can be put on anything - i even put it on fruit salad! it is not only delicious and healthy, the combination of garlic, vinegar with the mother, ginger and honey, all in conjunction, become a natural antibiotic. turmeric, cayenne and cumin are very good for your digestive system and for your overall health. if you eat this dressing every day, which we try to do, it will increase your overall health. you can also put this salad dressing on sardines - it tastes divine. and all of you better be eating a can of sardines at least once a week! i mean it! if not, i will have to come visit you and kick yer butt! and none of you want that! bahahahahhah!
please make this dressing, and make it to your taste. but don't leave any ingredient out. all of the ingredients are essential to maintaining good overall health!
next you dump in about a tablespoon of apple cider vinegar WITH the Mother in it.
next up is sea salt and freshly-cracked black pepper to taste.
a good pinch each of cayenne, turmeric and cumin.
3-4 cloves of garlic, a good-sized knob of ginger and a plop of unpasteurized honey.
a half of a lemon, or lime, squeezed in.
then you shake that baby up real good.
then you dump it on your salad.
the salad above is chiffonade romaine lettuce, tomatoe, cucumber, kiwi, orange, olives, feta and homegrown sprouts.
this salad below is iceburg lettuce, quinoa, 4 different-coloured peppers, broccoli, olives and feta.
and this is a bean salad with romaine lettuce, chickpeas, kidney beans, and 4 different-coloured peppers with cucumber.
this salad dressing can be put on anything - i even put it on fruit salad! it is not only delicious and healthy, the combination of garlic, vinegar with the mother, ginger and honey, all in conjunction, become a natural antibiotic. turmeric, cayenne and cumin are very good for your digestive system and for your overall health. if you eat this dressing every day, which we try to do, it will increase your overall health. you can also put this salad dressing on sardines - it tastes divine. and all of you better be eating a can of sardines at least once a week! i mean it! if not, i will have to come visit you and kick yer butt! and none of you want that! bahahahahhah!
please make this dressing, and make it to your taste. but don't leave any ingredient out. all of the ingredients are essential to maintaining good overall health!
Monday, March 24, 2014
braised wild rabbit - yummeh!
there is nothing on the planet more nutritious and delicious than wild, local food that you hunt and prepare for yourself - NOTHING! here on our island we have access to lobster, shrimp, mussels, clams, a wide variety of fish, pheasant, geese, duck, rabbit, deer and moose. i am sure that i am forgetting something, but trust me, we have access to this lovely wild food. and we are very grateful. my husband keeps us in beautiful trout during trout fishing season and friends of ours, who work the lobster and/or crab boats keep us supplied, we go "clamming" for clams and mussels, and several of our friends hunt (my hubby will start next year) during hunting season. a friend of ours recently gifted us with 8 wild rabbits that he snared himself on his own land. he also gutted and prepped them beautifully for us.
this recipe will work on wild rabbit, home-grown rabbit or store-bought rabbit.
a bit of back-info before we get to the recipe. in my opinion, whether you are roasting, braising or cooking meat in the crockpot - the VERY FIRST THING that you must do is to carmelize some onion in a pan with butter and EVOO. carmelize the onion on medium heat until it starts to soften and brown and then add in some carrot and celery and let those carmelize too! they will provide the base of any meat that you are cooking.
the next thing to mention is that when you are roasting, braising or cooking meat in a crockpot - please use broth/stock and not water! i am a big believer in making your own stock/broth as it is so simple - but at the very least, use store-bought stock/broth if you must. just not water! bleck!
ok, on to the recipe. which is more of a guideline. i have a penchant for blogs that write out the steps and explain what and why, and not just provide a recipe.
so, you have caramelized your onion, celery and carrot. remove these to a plate/pan/whatever. and the oil/butter that was in the pan is nice and browned and might even have brown bits in it. LEAVE THOSE THERE - they add flavour. next, you are going to take your rabbit and kind of split him in half using only your hands. just lay him on his back, bend his back legs away from his body, bend his front legs away from his body, and then press down near the spine. you might break the spine, no prob, but what you want is to flay the rabbit out as flat as possible. next you season your rabbit with salt, pepper, rosemary, sage, thyme - whatever seasonings you like. then you add more butter and EVOO to the pan that you cooked the onions, celery and carrot in and you place the rabbit down on his front-side or back-side. braise the one side for a few minutes until you see some colour, and then braise the other side. now add your rabbit to your roaster and sprinkle the onion, carrot celery all around. like this.
set your oven to 325.
next up - dump about 2 cups of stock/broth (hopefully home-made - it makes all the difference!) into the cooking pan. on medium heat, let it come up to a boil and scrape the bottom of the pan. this will bring up all the tasty brown stuff on the bottom and your pan will be clean and shiny when you are done. dump this over the rabbit and veg in the roaster. it should come halfway up the rabbit depending on what size roaster you use and depending on how much broth you want left over for sauce or gravy.
cover the roasting pan and cook for anywhere between 3-4hrs depending on the size of your rabbit. the longer you leave it in, the more tender the meat becomes and the more the flavours are able to mingle. after 90-100 mins, flip the rabbit and continue cooking for the remainder of the time.
once the rabbit is ready, remove it from the pan (don't be alarmed that the meat will fall right off the bones, strain your broth into another pan and either serve this as a sauce or make a gravy out of it. i always make a gravy.
here is my finished braised rabbit, served with wild rice, mushroom and cranberries.
i hope you enjoy this recipe. if you have any questions, just leave them in the comments.
this recipe will work on wild rabbit, home-grown rabbit or store-bought rabbit.
a bit of back-info before we get to the recipe. in my opinion, whether you are roasting, braising or cooking meat in the crockpot - the VERY FIRST THING that you must do is to carmelize some onion in a pan with butter and EVOO. carmelize the onion on medium heat until it starts to soften and brown and then add in some carrot and celery and let those carmelize too! they will provide the base of any meat that you are cooking.
the next thing to mention is that when you are roasting, braising or cooking meat in a crockpot - please use broth/stock and not water! i am a big believer in making your own stock/broth as it is so simple - but at the very least, use store-bought stock/broth if you must. just not water! bleck!
ok, on to the recipe. which is more of a guideline. i have a penchant for blogs that write out the steps and explain what and why, and not just provide a recipe.
so, you have caramelized your onion, celery and carrot. remove these to a plate/pan/whatever. and the oil/butter that was in the pan is nice and browned and might even have brown bits in it. LEAVE THOSE THERE - they add flavour. next, you are going to take your rabbit and kind of split him in half using only your hands. just lay him on his back, bend his back legs away from his body, bend his front legs away from his body, and then press down near the spine. you might break the spine, no prob, but what you want is to flay the rabbit out as flat as possible. next you season your rabbit with salt, pepper, rosemary, sage, thyme - whatever seasonings you like. then you add more butter and EVOO to the pan that you cooked the onions, celery and carrot in and you place the rabbit down on his front-side or back-side. braise the one side for a few minutes until you see some colour, and then braise the other side. now add your rabbit to your roaster and sprinkle the onion, carrot celery all around. like this.
set your oven to 325.
next up - dump about 2 cups of stock/broth (hopefully home-made - it makes all the difference!) into the cooking pan. on medium heat, let it come up to a boil and scrape the bottom of the pan. this will bring up all the tasty brown stuff on the bottom and your pan will be clean and shiny when you are done. dump this over the rabbit and veg in the roaster. it should come halfway up the rabbit depending on what size roaster you use and depending on how much broth you want left over for sauce or gravy.
cover the roasting pan and cook for anywhere between 3-4hrs depending on the size of your rabbit. the longer you leave it in, the more tender the meat becomes and the more the flavours are able to mingle. after 90-100 mins, flip the rabbit and continue cooking for the remainder of the time.
once the rabbit is ready, remove it from the pan (don't be alarmed that the meat will fall right off the bones, strain your broth into another pan and either serve this as a sauce or make a gravy out of it. i always make a gravy.
here is my finished braised rabbit, served with wild rice, mushroom and cranberries.
i hope you enjoy this recipe. if you have any questions, just leave them in the comments.
Monday, March 10, 2014
greek yoghurt dip/spread
this is a favourite dip/spread to have on hand at all times. it's
good as a spread for sandwiches, wraps. veggies, baked pita chips,
crackers or whatever!
Ingredients:
1 tub of greek yogurt
a 1inch chunk of cucumber
2 cloves of garlic (i use 4)
a squeeze of lemon juice
fresh-chopped, or dehydrated chives
a pinch of cumin
a pinch of cayenne
a pinch of turmeric
sea salt and fresh-cracked pepper to taste
Directions:
1. empty yoghurt into a mixing bowl. using a garlic press, press the cucumber into the yoghurt. use the garlic press to add the garlic. squeeze a quarter of a lemon into the bowl. toss in the chives and the spices. mix it all together. taste. adjust for seasonings.
we love this on pita with lettuce, herbed lebanese rice and hot peppers.
we also love it on wraps with stir-fried onions, peppers and avocado.
and again, you can use it as a dip for veggies, pita chips, crackers, etc.
no matter - it's deelish!
Ingredients:
1 tub of greek yogurt
a 1inch chunk of cucumber
2 cloves of garlic (i use 4)
a squeeze of lemon juice
fresh-chopped, or dehydrated chives
a pinch of cumin
a pinch of cayenne
a pinch of turmeric
sea salt and fresh-cracked pepper to taste
Directions:
1. empty yoghurt into a mixing bowl. using a garlic press, press the cucumber into the yoghurt. use the garlic press to add the garlic. squeeze a quarter of a lemon into the bowl. toss in the chives and the spices. mix it all together. taste. adjust for seasonings.
we love this on pita with lettuce, herbed lebanese rice and hot peppers.
we also love it on wraps with stir-fried onions, peppers and avocado.
and again, you can use it as a dip for veggies, pita chips, crackers, etc.
no matter - it's deelish!
Saturday, March 1, 2014
bean, chickpea and veg salad that even a man would eat!
as you all know - we love fresh and healthy food! here is a really yummy, and very filling salad. you can eat it for breakfast, dinner, supper or snack. it's always good to make a ton of it so that you snack on it for several days!!!
Kidney Bean, chickpea and veg salad
Ingredients:
(you can use whatever you have on hand!)
1 can of chickpeas (i prefer to use dried and soak them overnight but cheated using a can with this salad!)
1 can of kidney beans (same as above!)
green pepper, red pepper, orange pepper and yellow pepper, chopped (or any one, or any combination of)
1 small jar of artichoke hearts in oil, chopped - don't skip these - they are truly a delicious addition
Ingredients for the dressing:
8 or 9 swirls of olive oil
a good dollop of apple cider vinegar
the juice of half a lemon
salt and pepper to taste
as much, or as little garlic as you like, crushed (we use a ton)
a knob of ginger, crushed
big pinch of turmeric
pinch of cayenne
pinch of cumin
Steps for the salad:
1. drain your chickpeas and kidney beans. dump them in a big bowl.
2. add your chopped peppers.
3. add your chopped artichokes
Steps for the dressing:
1. dump all of the ingredients in a jar and shake, shake, shake.
To assemble:
1. dump the dressing all over your salad. make sure the salad is in a bowl/container with a lid. put lid on and shake, shake, shake. add more salt and pepper, to taste. bring bowl/container out into the snow and bury it in the snow for a good hour. or you could use your refrigerator. the snow works better, tho! lastly, chop up some romaine, iceberg or bib lettuce - whatever you have on hand and serve the bean salad over it. don't forget to add some home-grown sprouts and some slices of cucumber.
deelish. and filling. even better after it has sat a day or two. enjoy!
Kidney Bean, chickpea and veg salad
Ingredients:
(you can use whatever you have on hand!)
1 can of chickpeas (i prefer to use dried and soak them overnight but cheated using a can with this salad!)
1 can of kidney beans (same as above!)
green pepper, red pepper, orange pepper and yellow pepper, chopped (or any one, or any combination of)
1 small jar of artichoke hearts in oil, chopped - don't skip these - they are truly a delicious addition
Ingredients for the dressing:
8 or 9 swirls of olive oil
a good dollop of apple cider vinegar
the juice of half a lemon
salt and pepper to taste
as much, or as little garlic as you like, crushed (we use a ton)
a knob of ginger, crushed
big pinch of turmeric
pinch of cayenne
pinch of cumin
Steps for the salad:
1. drain your chickpeas and kidney beans. dump them in a big bowl.
2. add your chopped peppers.
3. add your chopped artichokes
Steps for the dressing:
1. dump all of the ingredients in a jar and shake, shake, shake.
To assemble:
1. dump the dressing all over your salad. make sure the salad is in a bowl/container with a lid. put lid on and shake, shake, shake. add more salt and pepper, to taste. bring bowl/container out into the snow and bury it in the snow for a good hour. or you could use your refrigerator. the snow works better, tho! lastly, chop up some romaine, iceberg or bib lettuce - whatever you have on hand and serve the bean salad over it. don't forget to add some home-grown sprouts and some slices of cucumber.
deelish. and filling. even better after it has sat a day or two. enjoy!
Subscribe to:
Posts (Atom)